If your decking is damaged or discoloured, you can restore it by using artificial grass. By installing synthetic grass on your deck, you are eliminating the need to fix, treat and seal your deck forever. Your new grass just needs an occasional hoover, or a quick scrub to remove any dirt. This is ideal for families or pet owners.
Astro Turf on Decking
You will also save money on the maintenance of your outdoor space. Deck paint and sealant can be expensive, and it’s a time consuming process. Brighten up your outdoor area with some artificial turf and you can enjoy spending time in your garden, without all the hard work!
How to Lay Artificial Grass on Decking
Step 1: Start by laying down some boards. This will prevent the grass forming ridges and falling into the gaps between the decking panels.
Step 2: Lay down an underlay product – such as our performance pad – and secure it well.
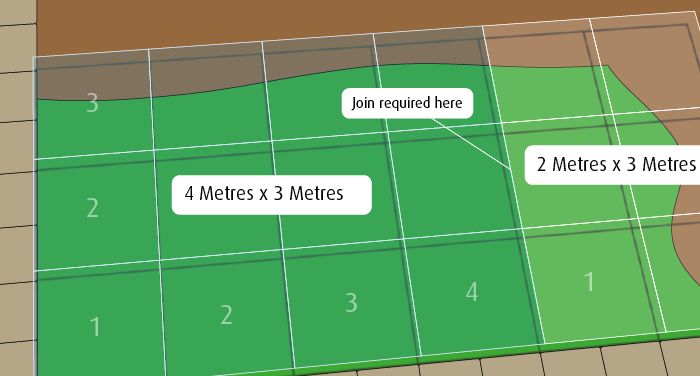
Step 3: Lay the grass onto the now clean and level area you are covering. Allow around 50mm of grass on each side of the area to trim off to ensure a perfect edge. Leave the grass overnight to settle, which will stop it wrinkling or creasing.
Step 4: Cut and trim your artificial grass, using a sharp Stanley knife. Ensure that you cut the grass neatly to the edges of the decking.
Step 5: To make the joins, use a high-quality outdoor tape and glue. Follow the instructions on the products. For decking, you can use a combination of adhesive and carpet tacks to fix the grass down.
Artificial grass is perfect for laying over decking. It’s easy to lay, looks great and solves a lot of problems for busy families. Hayley Leitch found it very useful for transforming her garden and reducing the hassle of natural grass. She solved the problems of mud, maintenance and marks with artificial grass, and is saving money to boot.
Is your decking looking a little tired and worn after winter? You could spend hours cleaning, treating and staining your decking. Or, you can lay artificial grass on your decking. It’s a durable, high quality solution that looks great. We have outlined the process below and answered your burning questions.
Can You Lay Artificial Grass on Decking?
Yes, you can lay artificial grass on decking. It’s a popular option for families and retired couples. It also works really well for families with dogs or other pets.
It does need an underlay and some preparation but it still works as an attractive and affordable landscaping option.
Below, Hayley Leitch talks about how artificial grass works for her family. She’s the star of Obsessive Compulsive Cleaners, and her own Youtube channel, Hayley’s Help.
It can be difficult to encourage children to get out in the great outdoors during the Spring/Summer months with so many obstructions online. With the weather starting to warm up in the UK, there’s no reason to not take advantage of the wonderful weather.
We’ve put together some garden activity ideas for kids this Summer to help them get creative and to create memorable experiences together as a family.
DIY Birdhouses
With recycling and up-cycling being at the heart of many UK households, we can utilise existing items and transform them into beautiful garden creations. Looking at your recycling materials before throwing them in the bin, could you utilise any finished and clean juice cartons, milk bottles, plastic boxes to create a birdhouse or feeder.
Get out various craft accessories, such as paint, coloured pens, stickers or natural items discovered in the garden to decorate. Let the kids help decide where to place the homemade bird feeder and note down the chippy friends as they enter the garden!
Garden Sketching
All you’ll need is a pen and paper for this activity. See what interests your child the most in the garden, whether that be a plant, flowers, birds, insects or your household pet and let your little artist draw to their heart’s content.
If your child is a frequent drawer or enjoys it, why not start a scrapbook? Not only is it great to keep all their artwork in one place, but also is a great way to reminisce when they’re all grown up.
If you’re choosing paint, over sketching, why not suggest it on a sunnier day so their masterpieces will dry much quicker?
Nature Art
Grab an old bedsheet or piece of fabric for the background let your little ones head on a scavenger hunt for natural materials in the garden to create a perfect picture.
Encourage your children to pick up objects around the garden, such as: stones, sticks, leaves, flowers (if permitted) to create their own story.
Rainbow Arts & Crafts
With the rainbow becoming the symbol of solidarity with NHS workers on the frontline, why not getting creative with your children to show your support? This could be painted, drawn, chalked on the pavement, paper plates, finger painting, using coloured paper as a collage – anything!
Place these showpieces when your neighbours and members of your community can see and to showcase your child’s work.
Cut 4 pieces of timber to the same height of the window. Secure two of the posts against the inside of the front wall. Decide how wide you want your bar to be. We would recommend half a metre (50cm) wide. Use your measuring tape to measure the distance and mark the floor with a pencil. Once you are happy, secure them in place.
Step 2 – Create the top of the bar
Create the top of your bar by cutting some plywood into shape. This should sit on top of the support posts, with a slight overhang at the front if you would prefer. Once you’re happy with the placement, secure it into place using a hammer and nails.
Step 3 – Cover the exposed side
To ensure that everything you store under the bar stays hidden, you can cover up the exposed side using some plywood. Measure the height of the posts and the width of the bar to find the dimensions. Once you’ve cut the plywood into place, secure it onto the side of the bar using a hammer and nails.
And there you have it! An outdoor bar in your own garden, perfect for entertaining guests and celebrating with your family.
Added Extras
Put up shelves on the back wall
To store your alcohol, you can put up some shelves on the back wall. Make sure they are level using a spirit level, and add some brackets underneath for extra support.
You should now move on to building the decking in front of your bar. Measure your decking boards to fit the space between your shed and the end of the platform. Safely cut them to size using a chop saw.
Step 2 – Secure the decking boards
Next, lay down your decking boards to ensure they fit correctly, using a spirit level to check they are level. You can then fix them into place, using 50mm screws.
Step 3 – Add posts to the corners
Add some wooden posts to the corners to support your handrail. Once they are level, fix them into place with some 100mm screws.
Step 4 – Add the railings
Cut the railings into the right length and screw them into place. Make sure these are extra secure.
Step 5 – Insert some spindles
Finally, cut some spindles to the correct length and secure these into place, evenly distributing them. We would recommend securing them two inches apart.
Cut two pieces of timber for the width and six pieces of timber for the length. You will need the four extra lengths to create inner joists. Position them in place before fixing together, to ensure that everything is the right size.
Step 3 – Assemble the base
Fix the outer frame together using an electric drill and screws. Next, place your inner joists within the frame and ensure they are equally spaced using a tape measure. Once you are happy, screw these lengths into the frame.
Building the shed
Step 1 – Lay down the floor
Lay down the floor of your shed on top of your platform. Check it is level using your spirit level. Once you’re happy, secure it in place.
Step 2 – Put up the walls
Erect your walls and secure them into place. You may need help from a family member in order to do this safely.
Step 3 – Attach the roof support bar
Measure the centre of your front and back panels to ensure that the roof support bar will be central. Fix this into position.
Step 4 – Adding the roof panels
You can now fix your roof panels to make the shed watertight. Once they are secure, you can add roofing felt, using felt tacks to keep it in place.
Step 5 – Attach trims and fascia boards
Finally, you can attach any trims which came with your shed, and fix the fascia boards on the front, covering the felt. You should pre-drill the holes to prevent them from splitting.
On long summer evenings, we all love to spend time in the garden with friends and family and have a barbecue. By creating your own outdoor bar, you can entertain your guests all night long. This is a great idea for your back garden, as well as for restaurants and pubs.
You can build your own structure using timber, or for an easy alternative, you can use a wooden shed as the main structure. Follow our helpful instructions to build your own outdoor bar or for general garden bar ideas to make the most of your summer evenings.
Before You Start
Before you start building, you need to prepare the area in which you’ll be building your bar. Remove any garden furniture or debris, sweep up any leaves, and ensure that the ground is level. If this preparation requires moving or lifting heavy items, ensure that you ask a family member for help.
You will need a fair amount of equipment to ensure that your outdoor bar is safely put together. We have included the equipment to build a platform for your bar to sit on, as well as the recommended shed style for your bar.
Following the preparation stage, you should now look to apply a non-oil-based moss killer onto the artificial grass/lawn. However, for the best results, we recommend doing so when the moss is actively growing and only when weather conditions are dry and no moisture is present/anticipated for several hours.
It is also vitally important to follow the manufacturer’s instructions as not all moss killers are the same. Following this, you should look to thoroughly rinse off the moss killer (if the manufacturer states). Once the moss has dried out and died, you will need to sweep/rake it to one side to make collecting and binning it easier.
And that’s it – for now at least! We do recommend that you reapply the moss killer once every few weeks if you continue to see moss growth.
If you need any further advice on artificial grass maintenance, get in touch with our friendly team.
Invented over 50 years ago, artificial grass is a surface of synthetic fibres made to look identical to natural grass. Today, you can find it nearly everywhere you look, from residential lawns to sports centres and stadiums.
Compared to conventional grass, artificial grass is able to stand up to heavy use whilst needing no trimming or irrigation – making it perfect for those who need a low-maintenance lawn. However, this isn’t to say that it’s “maintenance-free”. Like all man-made products, artificial grass does have a limited life span. However, with the proper maintenance and care, you can expect it to last up to (and even beyond) it’s estimated lifespan.
When caring for artificial lawns, one of the main issues owners face is moss. This typically takes the form of dense green clumps or mats and often occurs in damp or shady locations. Luckily, the method for removing moss is straightforward and can be done with relative ease. The basic steps are outlined below.
Preparation
Before you start, here’s a list of things that you’ll need:
A soft-bristled broom/brush or plastic rake
Moss killer (preferably non-oil-based)
Pruning shears or loppers
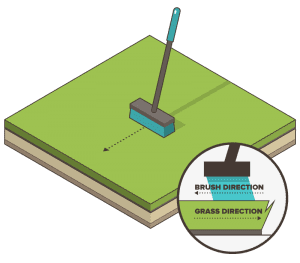
Once you’re ready, you’ll need to brush/rake the artificial turf – we recommend you do this either weekly or whenever debris accumulates.
When it comes to brushing/raking, you should alternate your direction each time to ensure a deep clean. This will also help prevent all the fibres from leaning in one direction.
Once all debris is clear, take your pruning shears/loppers and go around the garden/lawn and trim back any overhanging branches and overgrown vegetation. This will allow for better circulation of air whilst allowing more sunlight to reach the lawn. The goal here to try and eliminate the conditions that favour moss development.
Used artificial grass costs 50% to 75% less than new artificial grass, which is great on your budget!
However, used artificial grass may come with punctures from the forklifts that moved them. Proper installation of the used artificial grass will hide these punctures, but they could possibly allow a sliver of sunlight to reach the soil beneath it. Where sunlight can reach the earth, weeds will grow. This means that a weed suppressant membrane is even more critical when you install used artificial grass.
If you are interested in used artificial grass but have pets, regular maintenance and pet-friendly infill can mask any odors trapped by weed barrier.
Weed barrier fabric can mean the difference between a lush, realistic layer of artificial turf and lumps that weeds have pushed up. As long as you don’t have plans for the ground under your artificial turf, weed barrier can add years to the lifespan of your artificial grass with no downsides.